Configuring File-Based Backups in VCF on VxRail
- Allan Scott
- May 26, 2022
- 3 min read
So now that you have your new VCF on VxRail environment setup, one of the first things you should do is configure backups in SDDC Manager.
The first thing we are going to cover in this post is how to configure a Linux (Ubuntu, in this case) server to act as an SFTP Server that SDDC Manager can use to capture these backups.
Configuring SFTP in Ubuntu 20.04
For this step, I have a newly deployed Ubuntu 20.04 VM with a vmdk specifically for logs. I’ve given it a size of 250GB, but depending on your retention policy you might need more.
Configure SSHD
1. The first thing we do is configure SSHD by typing:
a. sudo vi /etc/ssh/sshd_configsshd_config
2. At the bottom of the file, add the following 3 lines:
a. Match Group sftp_users
b. ChrootDirectory /data/%u
c. ForceCommand internal-sftp
3. Save and close the file, then restart SSH with the command:
a. systemctl restart sshd
SFTP Directory
This directory will hold the users home directory and logs. Create the directory using the following commands:
a. mkdir -p /data
b. chmod 701 /data
Create the SFTP Group & User
1. First lets create a special group for all our sftp users:
a. groupadd sftp_users
2. Now we can create our special user that won’t have regular login privileges
a. useradd -g sftp_users -d /data/29cc/logs -s /sbin/nologin USERNAME
3. Next set the password for our new user
a. passwd 29cc
Create the SFTP Directory
1. Now we can create our upload directory specific to our new user and set the appropriate permissions:
a. mkdir -p /data/USERNAME/upload
b. chown -R root:sftp_users /data/USERNAME
c. chown -R USERNAME:sftp_users /data/USERNAME/upload
Login & Test
1. Now we can test out our user access to the SFTP Server by logging in, try creating and deleting files, making sure everything is working as expected.
a. sftp USERNAME@IP
Configuring SDDC Manager
In Figure 1, below, you will see that SDDC Manager actually gives you an orange colored banner at the top of the screen letting you know that the backups are yet to setup. Now, if this is a temporary environment, or a lab setup, you do not have to setup the external SFTP server for the backups. However, if this environment is going into production, you certainly will want to configure them.
The backup location not only sets the location for the SDDC Manager backups, but also the backup locations of the NSX Managers.

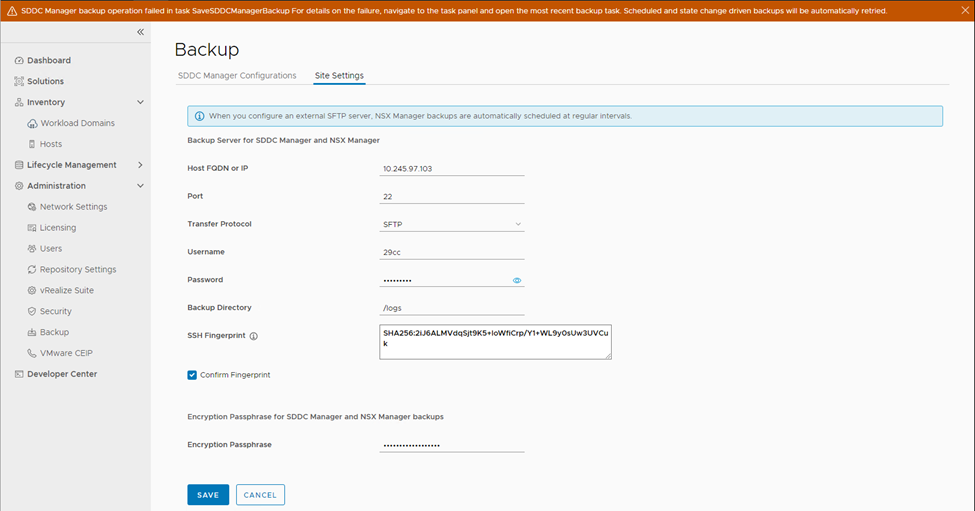
The first section to configure is the “Site Settings” as seen below in Figure 2.
Here you need to enter the following details:
Host FQDN or IP of the SFTP Server
The Port your Server is listening on
The Protocol – SFTP is the only option as of VCF 4.4
Username and Password of the account SDDC Manager will use to login to the SFTP Server
The backup directory
SSH Fingerprint – This will be auto populated once you have entered a valid FQDN or IP above.
Here you also have the option to confirm the fingerprint of the SFTP Server
Lastly, enter a password used to encrypt the backups.

Once you have saved the settings SDDC Manager will reach check connectivity and you can check the status in the task list below.

Next, we can switch over to the “SDDC Manager Configurations” tab and see the status of our last backup, force a manual backup by clicking on the “Backup Now” button and edit the automatic backup schedule.
One thing worth noting here is the ‘Retention Policy’. Given that these backup settings configure backups for both SDDC Manager and the NSX Managers, you might think that the ‘Retention Policy’ also affects both. Unfortunately, that is not the case. As of VCF 4.4, the Retention Policy settings here only affect the SDDC Manager backup. The NSX Manager backups will need to have their retention policy configured manually with something like Cron on the SFTP server itself.

Configuring vCenter
Now that we have our SDDC Manager & NSX Managers backing up, we can go one-step further and configure our vCenter Servers to use our SFTP Server also.
To do this, we simply need to navigate to the VAMI interface of our vCenter server - https://vcenterfqdn:5480.
Then, head on over to the ‘Backup’ tab on the left and click on ‘Configure’. As seen below in Figure 5, you need to give it the location for SFTP Server, user credentials, the schedule, an optional encryption password and configure the retention.
Once finished you click on ‘Create’ and then the vCenter Server will attempt to run a backup.

If everything was entered correctly, you should see the job complete successfully, as seen below in Figure 6.

Lastly, we can move back over to our SFTP Server and see what has been uploaded as part of these backups.
In Figure 7 below, we can see our NSX Clusters (Management & Workload Domain 01), SDDC Manager and vCenter Server have all successfully backed up to our new SFTP Server.

Opinions expressed in this article are entirely my own and may not be representative of the views of Dell Technologies.


Comments